Configuring Raspberry Pi as a VPN gateway using NordVPN with best server selection (Pi-hole with DoH setup optional)

Update (Nov/2020): Made a few modifications to make the script work again.
This is going to be a quick tutorial (/self-reference) to set up Raspberry Pi as a VPN router for NordVPN. I ran into so many issues (!) specially with the kill-switch part, so just wanted to write this up in case someone else is looking for the same. Obviously there are better ways of getting this done documented out there, but I wanted a custom setup with a few modifications as you will see. As an add-on, I installed Pi-hole for ad & malicious domain blocking with DNS over HTTPS (DoH), with the DNS queries now tunneled over VPN.
Disclaimer: I’m doing this on a fresh RPi installation with no firewall rules setup etc. So make sure to adapt the steps if you plan to do it on an existing RPi. Also the code snippets will need to be amended to include input validations and sanitizations if you want to run it on any critical / production system. Also hardcoding of credentials in plaintext is not that great either, but pursued in the interest of a test lab setup only and may not be fully suitable for real world use. Finally I don’t endorse or recommend NordVPN by writing this post. The ‘gateway’ method is pretty much the same for every VPN (be it self-hosted or 3rd party) and the whole purpose is to serve as a guide to configure the Raspberry Pi.
Requirements
- The RPi will be connected to the LAN network with a static IP address. Those devices wanting to use the RPi gateway should be able to edit the ‘gateway’ field under network settings and must be able to connect to the VPN seamlessly.
- The RPi will use NordVPN as the provider with a kill-switch to disable Internet in the event of VPN failure. NordVPN provides the kill-switch feature with their apps but not for RPi. Correction - NordVPN provides this. Thanks to u/4grams on Reddit for pointing that out.
- Ability to find the best server from NordVPN and establish the connection
- Ad blocking using Pi-hole for the devices using the gateway
- DNS over HTTPS (on Pi-hole)
Hardware
- Raspberry Pi 3B
- Micro SD card - 16 GB - Samsung EVO
Configuration
Set up RPi
- Official documentation link to burn Raspbian on to the Micro SD card. . I will be using Raspbian Buster Lite (Version:September 2019) for this tutorial.
- The rest of the tutorial will require ssh to be enabled. So create a blank file named ‘ssh’ and place in the root folder of the SD card. More details here - [3. Enable SSH on a headless Raspberry Pi (add file to SD card on another machine)]
- Eject the SD card, insert into the RPi and power it ON
- I’m not covering securing the RPi in this tutorial, so please make sure you do the necessary
Connect to the RPi using a tool like PuTTY
Run raspi-config utility to resize the partition and reboot
Configure static IP address for the RPI
Open /etc/network/interfaces and add the below lines. Make sure to adapt the info for your network setup.
auto eth0
    iface eth0 inet static
    address 192.168.0.100
    netmask 255.255.255.0
    gateway 192.168.0.1
Install updates, upgrades..
sudo apt update && sudo apt upgrade -y && sudo apt dist-upgrade -y && sudo apt autoremove -y
Install necessary packages
sudo apt install openvpn iptables-persistent python-requests -y
While installing iptables-persistent, it might ask if you want to backup the iptables rules. Go ahead and select Yes. This will be overwritten anyway at a later stage.
NordVPN setup
Download and unzip the NordVPN config files to /etc/openvpn
cd /etc/openvpn
sudo su
wget https://downloads.nordcdn.com/configs/archives/servers/ovpn.zip
unzip ovpn.zip
cp ovpn_udp/*.ovpn .
rm -rf ovpn_tcp ovpn_udp # Only using the UDP connections here, so removing the TCP folder
Create a file named /etc/openvpn/login.txt and insert the NordVPN credentials.
Chmod the login.txt file to 600 so that it is only accessible by root user
sudo chmod 600 /etc/openvpn/login.txt
Edit the NordVPN’s ovpn files to use login.txt. This is done by replacing auth-user-pass with auth-user-pass login.txt Here is a small python code snippet to do that.
#!/usr/bin/env python

import fileinput
import glob
import os

os.chdir("/etc/openvpn")

file_list = glob.glob("*.ovpn")

for item in file_list:
    for line in fileinput.input(item, inplace = 1):
        print line.replace("auth-user-pass", "auth-user-pass login.txt"),
Now, which NordVPN location do you want to connect to? You need to find the corresponding URL.
Visit the NordVPN server tools page where you can find the most optimal server
Open Developer Tools in your browser and click on XHR
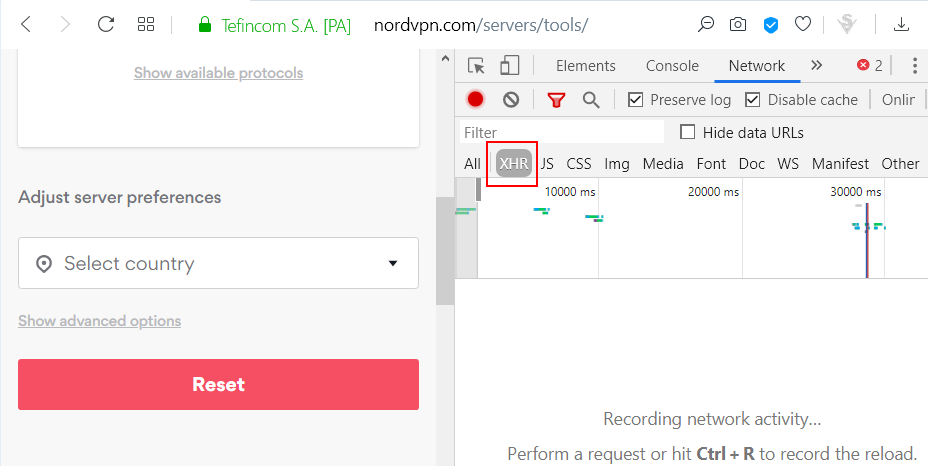
Now select the country that you want to use for the VPN connection and observe the XHR request that gets generated. Right click on the XHR request and copy the URL. The URL will be used in the next step.
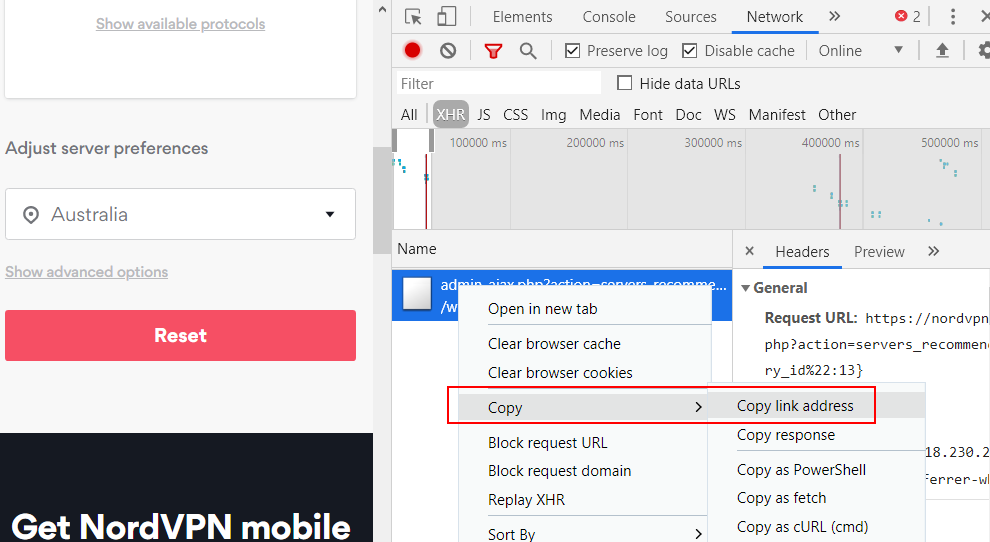
e.g. for Australia, the URL would be
https://nordvpn.com/wp-admin/admin-ajax.php?action=servers_recommendations&filters={"country_id":13}
NordVPN connection script
Now we need to tell the RPi to connect to the NordVPN server on boot. Here is a Python script that does that. Save it on your RPi - e.g. /home/pi/vpn/connector.py.
Make sure you fill in the url field in script from previous step.
#!/usr/bin/env python

import os
import json
import subprocess
import time
import requests

os.chdir("/etc/openvpn")

# Command to kill any running instances of OpenVPN
kill_command = "sudo killall openvpn"

# URL to the NordVPN server connection tool obtained from the browser
url = "" # Insert URL here

def start_openvpn_connection():
    response = requests.get(url)

    if len(response.text) != 2:
        nvpn_response = json.loads(response.text)
        vpn_info = nvpn_response[0]
        vpn_info_hostname = vpn_info["hostname"]
        vpn_file = vpn_info_hostname + ".udp1194.ovpn"

        # Command to start Openvpn
        ov_command = "sudo openvpn --config " + vpn_file

        # Start the NordVPN connection
        subprocess.Popen(ov_command.split())

if __name__ == "__main__":
    subprocess.Popen(kill_command.split())
    time.sleep(2)
    start_openvpn_connection()
Run the script at startup. There are various ways to do this. Here we will be using rc.local.
Open /etc/rc.local and insert the script before ‘exit 0’ line.

Find NordVPN server IPs
In the next step, we will be locking down the RPi to block all outgoing traffic and allow only NordVPN IPs. The NordVPN IPs will be used to fetch the best server for the location you opted. (This is not a very scalable approach to hardcode IPs but for the sake of this tutorial, we will use this. If NordVPN changes their IPs in future, make sure you update the iptables rules.)
Use nslookup to find NordVPN IPs (IMPORTANT: Make sure that you run nslookup when you set this up so that you are putting in the valid IP addresses for NordVPN servers)
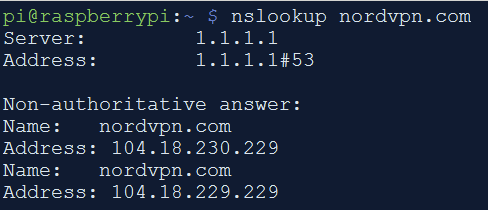
Add NordVPN IP addresses to hosts file and block outbound DNS
Open /etc/hosts file and add the below lines
104.18.229.229  nordvpn.com
104.18.230.229  nordvpn.com
Set up IP forwarding
Open /etc/sysctl.conf and uncomment the below line.
net.ipv4.ip_forward=1
Run the following command to enable the changes.
sysctl -p /etc/sysctl.conf
Iptables rules for allowing SSH, routing traffic, kill-switch, block outbound DNS whitelist NordVPN IPs..
Note: This will flush all your existing iptables rules.
Note: Make sure to replace 192.168.0.0/24 with the RPi’s LAN subnet from where you expect the devices to connect and use the gateway.
Note: Make sure you replace the IP addresses for NordVPN as well.
Save the following into a bash file and execute or run one by one.
sudo iptables -F
sudo iptables -A INPUT -p tcp --dport 22 -m conntrack --ctstate NEW,ESTABLISHED -j ACCEPT
sudo iptables -A OUTPUT -p tcp --sport 22 -m conntrack --ctstate ESTABLISHED -j ACCEPT

sudo iptables -t nat -A POSTROUTING -o tun0 -j MASQUERADE
sudo iptables -A FORWARD -i tun0 -o eth0 -m state --state RELATED,ESTABLISHED -j ACCEPT
sudo iptables -A FORWARD -i eth0 -o tun0 -j ACCEPT

sudo iptables -A OUTPUT -o tun0 -m comment --comment "vpn" -j ACCEPT
sudo iptables -A OUTPUT -o eth0 -p icmp -m comment --comment "icmp" -j ACCEPT
sudo iptables -A OUTPUT -d 192.168.0.0/24 -o eth0 -m comment --comment "lan" -j ACCEPT
sudo iptables -A OUTPUT -o eth0 -p udp -m udp --dport 1194 -m comment --comment "allow vpn traffic" -j ACCEPT
sudo iptables -A OUTPUT -o eth0 -p udp -m udp --dport 123 -m comment --comment "ntp" -j ACCEPT
sudo iptables -A OUTPUT -p tcp -d 104.18.229.229 --dport 443 -m comment --comment "nordvpn IP" -j ACCEPT
sudo iptables -A OUTPUT -p tcp -d 104.18.230.229 --dport 443 -m comment --comment "nordvpn IP" -j ACCEPT
sudo iptables -A OUTPUT -o eth0 -j DROP
sudo iptables -I FORWARD -i eth0 ! -o tun0 -j DROP

sudo iptables-save | sudo tee /etc/iptables/rules.v4
Reboot the Pi and make sure the VPN gateway is working. If you run into issues, check /var/log/syslog to see the errors.
Also kill the openvpn process and ensure that the kill-switch works.
Optional - Pi-hole with DNS over HTTPS
Install Pi-hole (make sure to select eth0 as the listening interface)
Install cloudflared and configure Pi-hole to use it. The Pi-hole configuration to use DoH needs to be done from the Pi-hole’s web UI.
Once Pi-hole is configured to use cloudflared, the DNS queries will now be tunneled over HTTPS over NordVPN.
NordVPN has its own ad blockers, I simply wanted to use Pi-hole for the ad blocking.
Speedtest results
All tests were averaged out over three runs on a 100 Mbps / 24 Mbps line. The VPN connection was made to the closest geographical server.
| Connection method | VPN enabled | Download (Mbps) | Upload (Mbps) |
|---|---|---|---|
| RPi -> router | No | 77.8 | 3.5 |
| RPi -> router | Yes | 61.0 | 3.5 |
| Mobile device -> RPi -> router | Yes | 45.1 | 23.5 |
Hope you find the tutorial useful. If you have any queries, suggestions etc. please post a comment and I will try to answer.
References:
https://dietpi.com/phpbb/viewtopic.php?t=2185
Update 1 (31/12/2019):
Change log:
- Removed redundant iptables rules
- Blocked outbound DNS queries on port 53, added NordVPN IPs to hosts file
Update 2 (31/12/2019):
Change log:
- Added Speedtest results
Update 3 (01/11/2020):
Change log:
- Fixed script to make it work again